Fiberglass Deck Repair-Part II
Creating a non-skid deck

By Bruce Niederer
This racing season onboard Triple Threat has been filled
with the usual mix of tedium, laughs, and excitement. It's a
good thing when the exciting part is due to close racing and
fast downwind surfing-it's a bad thing if the excitement
occurs when the foredeck crew nearly goes overboard because
the deck is wet and the non-skid has the texture of a slip n'
slide! I'm happy to report no instances of skidding off the
foredeck this year, as there had been in years past, because
this year the non-skid was brand new. (Author's note: Any
foredeck incident was due to crew error. I can say that with
authority because as skipper/helmsman, I never have to leave
the cockpit and so am perfectly positioned to tell everyone
else what they are doing WRONG!)
In Epoxyworks 19 (Part
I of this article), I detailed the process of removing all
the hardware and repairing the areas where I discovered rotten
core. The last photo in Part I showed the deck after repairs
were completed and the deck had been painted with 2 coats of
primer in preparation for the next phase of the project:
creating a non-skid deck. I'll pick up the details at this
point.
In Part I, we left the
repaired deck with two coats of primer, ready for finish paint
and non-skid.
We prepared the deck for sanding by first wiping down the
entire deck surface with DuPont Prep-sol™ 3919S solvent using
plain white paper towels. This product removes organic
contaminants, silicones, and waxes. It's always a good idea to
remove such contaminates before sanding instead of relying on
sanding alone to do the job. Sanding can grind contaminates
into the sanded surface, which may be a problem with future
bonding of epoxy and paints. (Avoiding surface contamination)
We sanded the deck using 80-grit aluminum oxide sanding discs
on a random orbital sander. The goal was not to sand off all
the worn non-skid profile but only to make a relatively
uniform surface to cover with primer. We used a shop vacuum to
clean the majority of sanding dust followed by a wipe down
with damp paper towels. This is typical of how we removed
sanding dust each time it was necessary. It is important to
work clean once you get to this stage, so we kept a clean damp
sponge to wipe our shoes each time we stepped on board. We
also kept dedicated boat shoes in the boathouse to wear while
working.
We chose US Paint™Epoxy Primer White Base as the primer.
This is a 1:1 system, which is easily mixed and applied with a
WEST SYSTEM® 800 Foam Roller Cover and foam brushes, when used
with the proper converter. With two people working side by
side from bow to stern, tipping as we went, we applied the
first coat of primer in about 45 minutes. This coat was
allowed to dry 24 hours. The next day, we prepared the entire
primed surface using an abrasive pad on most areas and
220-grit sandpaper on any area that needed a bit more
attention. We applied a second coat in the same way as the
first and allowed it to cure until the next weekend.
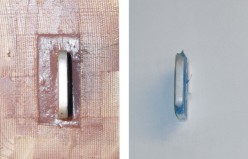
The
chainplates, isolated from the core material with an annulus
of thickened epoxy, before (left) and after fairing, barrier
coating and priming (right).
The final coat of cured primer was sanded with 220-grit
sandpaper and the deck cleaned in typical fashion to prepare
the surface for a topcoat. We chose US Paint products for this
application as well-Awlgrip™ Matterhorn white urethane paint,
a flattening agent for urethane topcoats, T0031 Reducer, and
an Awlcat™ brushing topcoat converter. Let me briefly discuss
these materials and why they were chosen.
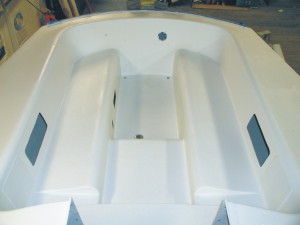
The cockpit
after priming with US Paint™ epoxy primer white base, applied
with an 800 foam roller.
Awlgrip products are well known to be a quality line of
products. Their urethane paints provide excellent
wear/durability characteristics including UV radiation
stability. Urethane paints are generally superior at UV
resistance than epoxy paints. Epoxy paints used in the
automotive industry, for instance, are over-coated with a
clear coating that provides UV protection for the colored
layers below. Matterhorn white is an off-white color with a
slight silver/gray tint to it. Without any tint, the
reflection from a bright white deck would be blinding on a
sunny day. Most whites have some color of tint added to cut
down on the brightness and to complement surrounding colors
like the hull color or stripes. Additionally, we used a
flattener to help cut down on glare. Flatteners contain a
solvent base similar to the paint system being used that is
heavily loaded with silica crystals. When properly shaken, it
has a consistency much like the thick Cream of Wheat™ your
mother used to force you to eat. The brushing topcoat
converter differs from the converter used for spray
applications. The spray converter yields a cure time too fast
for brushing or rolling, making it quite difficult to maintain
a wet edge to feather into. For the smooth coats only, we used
T0031 reducer, which extends the coverage and helps prevent
runs and orange peels by allowing thin, even coats to be
applied. All portions were mixed by volume as follows: 2 parts
Matterhorn white, 1 part flattener, 1 part converter, 1 part
reducer. We applied two coats over two days just as we had
applied the primer and allowed the paint to cure until the
following weekend.
The first job when we returned the next weekend was to tape
off all the areas we wanted to remain smooth. Then we sanded
all the surfaces that were to be non-skid with 220-grit paper
or an abrasive pad and cleaned in the usual manner. To create
the non-skid, we prepared the same paint mixture as for the
smooth coats, but without the reducer. Then we added 406
Colloidal Silica until the paint was the thickness of drywall
mud. This mixture was spread out on the deck with an 809
Notched Spreader using the middle-sized, " notches. This was
then rolled through lightly, using a medium nap roller cover,
to create a texture like stucco. Two of us, working side by
side like before, were able to apply the non-skid in a little
more than an hour. The paint was allowed to cure overnight
before the tape was removed, and then allowed to cure until
the following weekend before anything else was done.
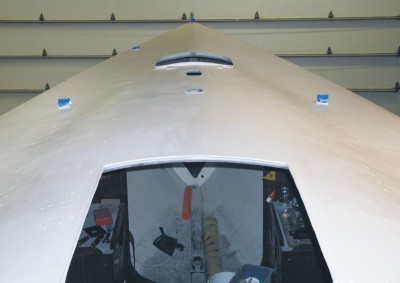
The finished
project. After two coats of Awlgrip™ Matterhorn white
urethane, we masked off the areas we wanted to remain smooth.
We mixed and applied a third coat thickened with 406 Filler to
create the non-skid texture.
At this point the repairs were done, the deck was painted
and new non-skid applied, so all that remained was to re-mount
the hardware and the job was complete. This actually took
several weeks to complete and was a pain in the…back! All
kidding aside, I wrote this article in hopes of encouraging
others not to shy away from undertaking a project of this
scope.
Materials for the entire project cost approximately $2,800,
which includes $1,000 for the deck paint, primer, and
additives; $975 for new aluminum rails; $200 in gelcoat for
the transom; $200 in paint for the mast; $250 in hardware and
miscellaneous supplies; and $175 for WEST SYSTEM® products
including fiberglass. Given all that we accomplished working
weekends only over 4½ months, we saved easily twice that
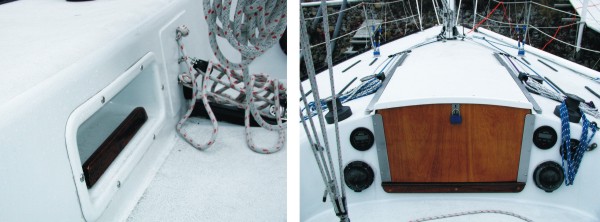
amount in labor costs. As you might gather from the photo of
the finished deck and mast, the deck repair project was well
worth the effort.
Epoxyworks 20 / Fall 2002
Copyright © 2002,
Gougeon Brothers, Inc. All rights reserved.
This page is
maintained by Gougeon Brothers, Inc. Last Modified on
10/28/02.
Reproduction in any form, in whole or in part, is
expressly forbidden without the consent of the publisher.
EPOXYWORKS, Gougeon Brothers, WEST SYSTEM, Episize, Scarffer
and Microlight as used throughout this publication, are
trademarks of Gougeon Brothers, Inc., Bay City, Michigan,
USA.