Fiberglass
Deck Repair-Part 1
Replacing
damaged balsa core

By Bruce
Niederer
I love my boat. I love to spend time with it-sailing it,
working on it, improving it.
I think I need my head examined.
Seriously, there's got to be something wrong with me! I
actually expected that applying a new non-skid deck to Triple
Threat, our 1981 Pearson Flyer, would be a fairly
straightforward project. I always think like that before I get
started. One would think I might know better by now, but that
type of learning apparently requires some protein sequence
that's missing from my DNA.
I started the project by removing all the hardware from the
deck-winches, cleats, instruments, lights, sail
tracks-everything. This included the old teak toe rails, which
I would replace with extruded black anodized aluminum. My
apologies to wooden boat enthusiasts, but since I primarily
race our boat, maintaining wood trim is time wasted for me.
After removing everything, I planned to apply the hardware
bonding techniques described in the WEST SYSTEM® User Manual
and repair manuals. Hardware bonding involves drilling all the
existing holes oversized. These holes then get filled with
thickened epoxy and the proper sized hole is re-drilled
through the center of the epoxy when the hardware is ready to
be remounted. Doing this would be a good way to protect the
balsa core from moisture damage.
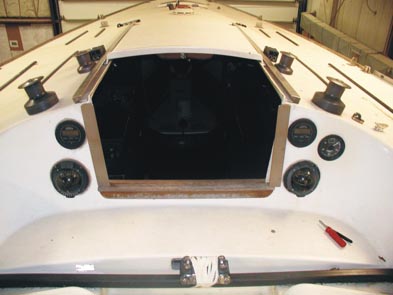
Before removing
the hardware, it looked like a straightforward project.
As I started drilling the oversize holes, my project
expectations headed south. There are tracks for the #3 Jib
just behind the chainplates, and drilling these holes oversize
revealed that the balsa wood coming out was black and wet.
This is bad. When I used another technique where a bent nail
or Allen wrench is mounted in a drill motor and used to ream
out more core material than just the diameter of the hole,
water actually splashed out on deck. #@*%! This was worse. I
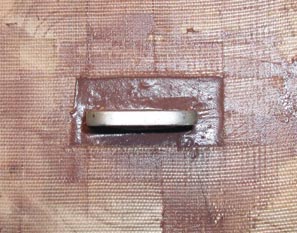
found the same condition where the middle reaching track for
the #1 Genoa is mounted (below). So now, my new non-skid deck
replacement would have to include removing and replacing the
bad core-on both sides of the boat, of course.

The damaged
core began to be revealed when the hardware was
removed.
To replace the core involves removing the fiberglass skin
to expose the core. This can be done either from the topside
or below deck. In my case, since the deck was getting new
non-skid anyway, the repair would be easier from the topside.
Using a circular saw, shallow cuts were made just deep enough
to cut through the top skin to open up the damaged area once
the skin was removed. A series of cuts were needed, enlarging
the area incrementally until good core was reached. The bad
core that didn't come out with the glass skin was removed with
a chisel (below).
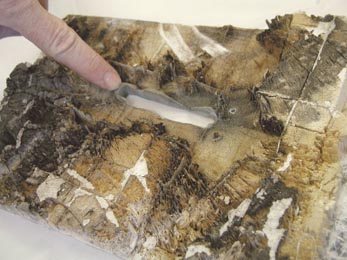
Surprisingly,
much of the damaged core was well bonded to the glass skin, as
it was to this section of skin around the chainplate.
It may seem odd that rotten, wet balsa was still bonded
securely enough that it had to be removed with a chisel. Many
folks have the misconception that balsa is a poor choice for
core material, that it will act like a sponge and disintegrate
quickly if water gets to it. This is not the case. End grain
balsa retains a high percentage of its compression strength
and structural integrity for a surprisingly long time after it
gets wet exactly because of the grain orientation. Water soaks
in much more slowly perpendicular to the grain than it does
with the grain-and the end grain is bonded to the skins, so
it's inaccessible. There was no softness in the deck or any
indication of the core damage in the deck while the boat was
in use last season. Eventually there would have been, but
since the boat is 20 years old, I was very impressed with how
well the balsa performed over the years. Yes, it's heavier
than foam, but foam cores have their own weaknesses to be
dealt with, and it's wise to replace whatever core was
originally used with the same material. Assuming the skins are
the same, a balsa core laminate would be stiffer than a foam
core laminate due to balsa's higher density and shear modulus.
Also, according to the Forest Products Laboratory ratings of
numerous wood species regarding rot resistance, balsa has the
same rating as okoume and meranti: mildly resistant. Okume and
meranti are widely considered a good choice for marine
applications especially when properly coated and installed.
So, application and technique are the key factors in using any
mildly resistant species of wood, balsa included.
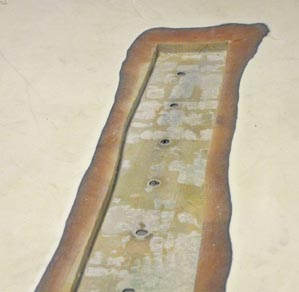
The exposed
openings were prepared for repair after the bad core was
removed. A 12:1 bevel was sanded into the fiberglass deck skin
around the openings.
After the damaged areas were defined and the bad core
removed, the exposed openings needed to be prepared for the
repair (above). First, the inside of the exposed bottom skin
was sanded with a palm sander and 80-grit paper to clean and
level the surface that the new core would be bonded to. Then a
smooth and uniform 12:1 bevel was sanded in the fiberglass
deck skin around the openings with an orbital sander. Since
the skin was 1/8" thick, this meant the bevel extended 1½"
back from the edge of the cut (below). The 12:1 bevel is
necessary to provide adequate bonding surface when laminating
in the skin repair patches. (Refer to 002-550 Fiberglass Boat
Repair & Maintenance, Chapter 5.)
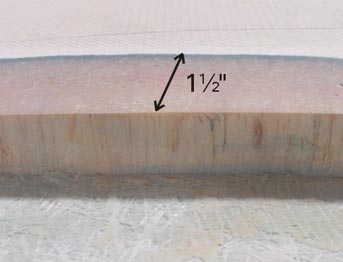
Since the skin
was 1/8" thick, I needed to grind 1½" back from the edge of
the cut to make a 12:1 bevel.
Next, ¾" contour core balsa was cut to fit the openings.
The term 'contour core' means that the core, whether balsa or
another core material, has a series of cuts through it.
Typically these cuts run perpendicular to each other along the
length and width about 1" to 1½" apart, forming a grid of
blocks that are held together by a loosely woven cloth called
scrim. This allows the core to follow curvatures in the deck,
whether convex or concave. One problem in using contour core
is that the blocks of core will separate to some varying
degree in conforming to a curve. The resulting gap must be
filled to prevent water migration within the deck or hull.
With this in mind, I installed the core using a two-step
bonding technique.
The first step was to brush neat (unfilled) WEST SYSTEM®
105/206 over the entire bonding surface inside the opening.
This was necessary because even after sanding, the surface
remained somewhat irregular because of the chopped strand
fiberglass used to build both the upper and lower deck skins.
The neat epoxy flows to better fill this fairly level but
uneven surface. The next step was to thicken 105/206 with 407
Low-Density Filler to a consistency slightly thicker than
mayonnaise. With an 809 Notched Spreader, a small amount of
this "core bedding" mixture was applied around the edges of
the repair against the existing core; more was spread out over
the neat, uncured epoxy already brushed on the area. The core
was then draped over a 10" diameter PVC tube. Then core
bedding mixture was applied in the cuts between the blocks as
they opened, both in the 0° and 90° directions, when the tube
was rolled. Then the filled core was fit in place and
compressed down, squeezing out any excess bedding mixture.
Finally, the repair area was cleaned up, all excess bedding
mixture was removed, and any voids or gaps were filled using a
squeegee, taking care to maintain the 12:1 bevel (below). A
layer of release fabric was placed over the repair and worked
down with a squeegee, and everything was allowed to cure
completely.
The core was
fit in place and compressed to squeeze out excess bedding
mixture, and any excess bedding mixture was removed.
The density of the core bedding mixture is greater than
that of the core. Therefore, care should be taken to avoid
filling too large an area with bedding mixture. This can cause
hard spots that affect the designed stress loading patterns of
the deck structure or exotherm if too thick of a layer is
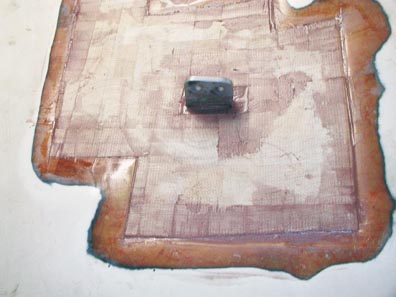
applied at one time. One area that was filled with the epoxy
bedding mixture was around the chainplates, which are
notorious for leaking, and were the primary source of trouble
on Triple Threat as well. A gap was left between the core and
the chainplate on all sides, then filled with the core bedding
mixture to isolate the new core from any water that may leak
along the chainplate in the future (below).
A gap between
the chainplate and the new core was filled with bedding
mixture to isolate the core from any water that may leak along
the chainplate.
The next step involved cutting fiberglass for the patches
and laminating them in place. As mentioned earlier, both the
top and bottom fiberglass skin of the deck laminate is
completely built using chopped strand construction. This was
undoubtedly achieved using a chopper gun, which was and
continues to be, widely used in production boat building where
polyester or vinylester resin systems are used. The thickness
of a piece of removed deck skin measured with calipers was
approximately 0.14". Instead of doing the whole repair in
chopped strand mat alone, I decided to use Episize™ 738
Biaxial Fabric with mat, which is a 15 oz/yd2, ±45° fabric
with an 8 oz chopped strand mat on one side. The main reason
was that I could build up the same skin thickness with only
two layers of the 738 as opposed to 3-4 layers of chopped
strand mat. Measurements indicated that two layers of 738
would make the repair slightly lower than the surface of the
surrounding deck. This depression would eventually get filled
and sanded.
The repair patch technique mentioned starts with the 12:1
bevel that was ground before the core went in. Then, two
pieces of 738 glass were cut to shape for each repair area.
The bottom, or first piece in, got cut so that it fit about ½"
smaller than the outer edge of the bevel around the
circumference of the repair. The top piece was cut so that it
was about 1"-1½" smaller around the same circumference. Using
WEST SYSTEM® 105/206 and a squeegee, the two patches were
laminated into each repair area, the larger piece going in
first followed by the smaller one (below). We are very
confident based on testing done at GBI that this repair
technique (described in detail in Chapter 4 of 002-550
Fiberglass Boat Repair & Maintenance) will produce the
strongest repair possible. Once again, 879 Release Fabric was
used to firmly squeegee the repair laminate in place, to
compact the fibers, and to create a no-prep surface for
fairing.

With the larger
piece of fabric going into the repair area first, followed by
the smaller one, only the edges of the fabric are abraded when
the repair is cured and sanded.
Once the epoxy cured for a few days, the release fabric was
removed. Any rough edges or high spots around the
circumference of the repairs were sanded off with an orbital
sander. Then a fairing mixture of 105/206 with 407 Low-Density
Filler was prepared to a consistency of peanut butter. The
higher the percentage of 407, the easier the sanding would be.
I made a special tool using an old heavy mainsail batten
mounted to a piece of wood so that half the batten was off the
wood (below). The tool was long enough to span beyond the
length of the long repair. The areas that needed filling were
slightly overfilled with the fairing mixture using a squeegee;
then, the batten tool was used like a long spreader to smooth
and scrape off excess mixture. This was allowed to cure a
couple of days. Then a 4' longboard (long sanding block) was
used to sand the filled patches. High and low spots were
identified, more filler was applied where needed, and the
repair was sanded with the longboard again. Once the repaired
area was smooth and fair with the deck, a neat coat of 105/206
was rolled over the sanded 407 surface to fill any porosity
and to ready the surface for painting.
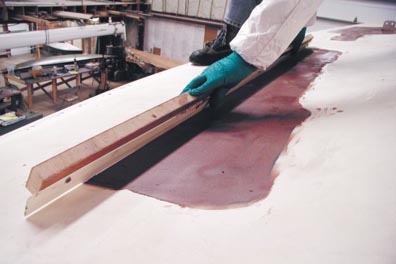
I used the
batten tool like a long spreader to scrape off excess
mixture.
After all this, I was finally back to where I started.
Having replaced the damaged balsa core, I was ready to
properly reinstall the hardware to avoid more damage, and get
back to applying a new non-skid surface to the deck (below).
In the next issue of EPOXYWORKS I will describe the details of
that portion of the project. I should be nearly done by then.
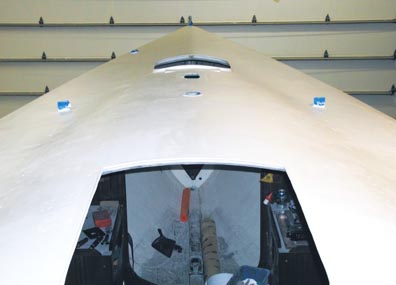
After all this,
I was finally back to where I started-ready to start applying
new non-skid.
Epoxyworks 19 / Spring 2002
Copyright © 2002,
Gougeon Brothers, Inc. All rights reserved.
This page is
maintained by Gougeon Brothers, Inc. Last Modified on
10/28/02.
Reproduction in any form, in whole or in part, is
expressly forbidden without the consent of the publisher.
EPOXYWORKS, Gougeon Brothers, WEST SYSTEM, Episize, Scarffer
and Microlight as used throughout this publication, are
trademarks of Gougeon Brothers, Inc., Bay City, Michigan,
USA.