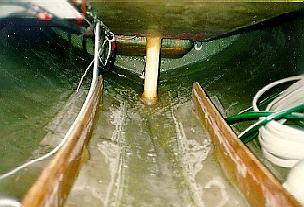
 The rudder on the Pearson 26 is solid fiberglass with an aluminum shaft and weighs 85 lbs. I have heard that some later boats had stainless shafts but I have not seen any myself (If your P26 has a stainless rudder shaft let me know the year and hull # - dan@pfeiffer.net). The rudder is almost identical to the Pearson 30 of the same vintage. A 1976 P30 in my marina does have a stainless shaft. According to Practical Sailor, the first 200 P30's had aluminum shafts which were replaced by Pearson with stainless shafts. The rudder tube on the boat is fiberglass and runs from the bottom to the cockpit sole. The tube is quite thick and husky and slopes forward about 16 degrees. The tube is glassed to the inside of the hull and the bottom of the cockpit floor. There was silicone sealant applied at the top of the rudder tube in the cockpit but it was not glassed in here. The balsa core is protected from water only by the sealant between the rudder tube and the cockpit floor. There is a plastic cap covering the top of the rudder tube in the cockpit. The cap is held down with screws that go into the balsa core. The rudder shaft is supported at the top and bottom by plastic bushings that are about 1.5 inches long and fit in between the shaft and the tube. The rudder is fastened in place with a stainless steel collar. A bolt runs through this collar and through the shaft to keep the rudder from falling out. There is a plastic thrust washer between the collar and the top of the upper rudder bushing. (People (myself included) use the term bearing and bushing interchangeably.)
 I removed the rudder from the boat. This was a simple task. I supported the rudder from under the boat and had a helper unbolt the retaining collar in the cockpit. I then lowered the rudder from the rudder tube. Be careful with this, the rudder is very heavy - 85 lbs. Before I had the boat on a cradle I used jack stands. To get the rudder off with the boat on jack stand I had to dig a hole. On the cradle I had plenty off room. The bushings slide out of the rudder tube. They have a flat side to keep them from rotating in the tube.
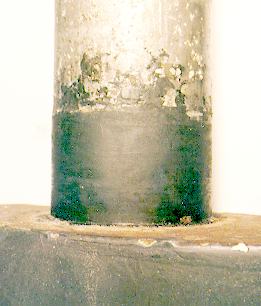
Once the rudder was off the boat I carefully inspected the shaft. The bushings make contact with the shaft at the top and bottom. These parts of the shaft were worn to a smaller diameter. I measured the shaft diameter as 2.375" (more on this later). The diameter at the bushing contact point was .010" to .015" smaller. This is a big difference and was the source of the excessive play.
The 1st solution suggested by other Pearson owners was to replace the rudder bushings. I got a new set of derlin bushings from D&R Marine in Assonet, MA for $64.00 (See the Parts Sources page for D&R Marine). I received the new bushings and went to test fit them on my rudder shaft. They were too small to fit over the shaft. I called D&R and they told me the shaft diameter should be 2.349" and bushing inside diameter should be 2.354. the bushings were right but my rudder shaft was 2.375 on the un-worn parts - .026" too large. That's about a 32nd of an inch. There was no way those bushings were going on the shaft. D&R suggested splitting the bushings but I did not like that solution. But they were very helpful and took the bushings back. I was still faced with my original problem. For whatever reason the rudder shaft on our 1976 P26 (#1205) was 2.375" diameter instead of the 2.349 specified by D&R.
Even if the new bushings had fit the rudder shaft it would not have solved my problem. The worn sections of the shaft would still have been .010" to .015" too small and I would still have had excessive play in the rudder. I thought if I could put a shim of some sort on the rudder shaft I could fill the gap and take out the play. I decided to try this using West System epoxy with a graphite additive to make a collar or shim. Here's what I did step-by-step...
- I picked out the old rudder bushing with the smallest inside diameter. I then sanded the inside surface with 400 paper to a smooth finish.
- I applied a coat of wax to the entire surface of the smoothed rudder bushing to prevent the epoxy from adhering to it. I waxed the inside and outside. The epoxy can get everywhere when your working with it.
- I cleaned the surface of the rudder shaft and sanded it with 80 paper to give a good surface for epoxy adhesion. I also cut a couple of vertical grooves in the shaft surface to help lock the epoxy collar so it would not be able to rotate on the shaft. I think now the grooves were a waste of time and I would not do it. And they probably weaken the shaft a bit.
- I etched the aluminum surface following the instructions in the West System 860-8 Aluminum Etching Kit.
- I coated the entire rudder shaft with straight West System epoxy to protect it from corosion since I had sanded off the anodizing.
- I mixed the epoxy for the bushing surface. I used 3 pumps worth and added 3 heaping tablespoons of West System #423 Graphite Powder until I had a consistency between mayonnaise and peanut butter - smooth but not too runny.
- I applied the epoxy to the rudder shaft spreading it a evenly as possible to a thickness just a bit larger then I needed.
- I slid the waxed rudder bushing over the shaft and over the epoxy and turned it to smooth out the epoxy surface. I ran it all the way down on the shaft and cleaned up the excess by scraping it off with a putty knife and wiping it up with West System 850 Solvent on a rag. I did my best to center and align the bushing on the shaft.
- After the epoxy had set up I removed the bushing. At first I thought I had permanently attached the bushing to the rudder shaft but after getting it loose it came off fairly easily. I used a Vise Grip Quick Clamp with rubber caps to grip the bushing and rotate it. An oil filter tool (the band type) would also have worked well.
- The epoxy surface was very smooth but there were a few voids where the epoxy did not quite fill the gap. Another application of epoxy filled these in easily.
- I lightly sanded the epoxy surface and installed the bushing with lithium grease.
 Now I had a new bearing surface. The graphite additive in the epoxy makes the surface very hard. I repeated the process for the upper bushing surface and re-installed the rudder on the boat. I now had no detectable play in the rudder shaft even at the tip of the rudder. We sailed the boat for an entire season. After haulout I inspected the rudder shaft. The epoxy surface showed no signs of wear. A better additive then the graphite might be aluminum powder. This is used as a water proofing additive in West System. It is also very hard - have you ever tried sanding this stuff after applying it to your keel? The graphite seems to work very well. And it should provide some lubrication but I would still grease it.
 That's the basic proceedure. I re-did the lower surface after the first season because I had not properly etched the aluminum rudder shaft surface and there was an adhesion problem. But the epoxy surface came through the entire season showing no signs of wear. I have now gone through 2 seasons with no trouble from the rudder bushings. I did some experimenting with the epoxy and graphite powder to find a good mix ratio. I would sugest this to anyone interested in trying this repair on their P26.
-DHP