 The mast on the P26 is stepped on deck on an aluminum casting. The casting is fastened to the deck by two long screws that go through the plywood cored deck and into a plywood mast support beam inside the boat. This support beam spans the doorway in the main bulkhead and is supported by two compression posts on either side of the door. The compression posts are fastened to the main bulkhead with screws and fastened to the fronts of the settee and dinette seats with large bolts.
 I replaced all the wires to the mast step (and added a few). You need to remove the mast support beam to get at the wiring. This REQUIRES UN-STEPPING the mast and removing the compression posts. These are held to the main bulkheads by screws and bolts - no cutting. The mast step is fastened down to the cabin top by two long screws that go through the deck and into the mast support beam. On early P26's they have square heads, mine have hex. The deck core is plywood in this area.
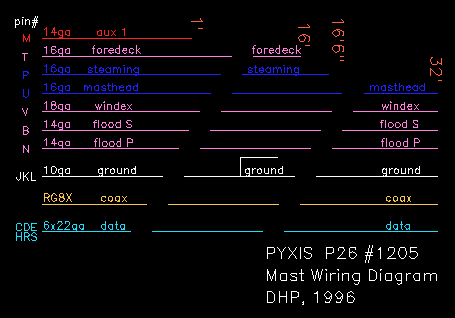
 The wires run into the mast step and into a channel in the top of the mast support beam then back up above the headliner and over to the hanging locker. You can't pull these wires out or pull new/additional wires through. I ran the new wires through a channel to the molded part of the headliner that holds the bulkheads in place and used that as a conduit to the hanging locker. It was fairly easy (compared to landing a man on the moon) to snake the wires through. I did this before assembly of the mast support beam/compression posts. I put in wires for masthead, steaming, foredeck, spreader and windex lights, and a wire to a power jack at the base of the mast for my spot light (very handy), 2 extra circuits, an 8 wire data cable in case I ever got wind instruments, the VHF coax and a wire to ground (bond) the mast step to the keel (don't know if this is any use). I got some hand-me-down wind instruments last year and I was real glad I had put in that data cable. All of the wires run to a junction box in the hanging locker except the VHF coax which runs un-broken to the radio.
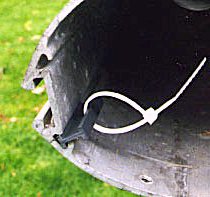
 I also built a new wiring harness for the mast and came up with what I think is an excellent solution to securing it inside. On the back side of the mast there are 2 T-shaped grooves (this is inside the mast). I made slides that attach to the harness with zip ties and slide into the groove. I placed them every 3-4 feet and the harness is secured. I made the slides from some plastic I-Beam parts I got at a model shop. Modelers use them to make scale structures. The I-beams are Plastruct PLS90029 1/2"x1/4". I had to pull one slide back and forth through the groove on a line to clean the spider web stuff out of it. Then the harness slid right in. I lubricated the track with soap to put in the harness. The harness is secure and does not slap and there is nothing to get in the way of the halyards. Total cost for the slides (with ties) was less than $10.
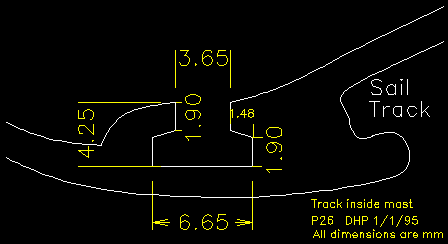
 At the 2000 Anapolis boatshow I went to the Metalmast booth and asked about slugs for the track inside the mast. The rep pulled out a bag of 20 nylon slugs which I promptly bought for $4.50. I will use these the next time I pull the wiring harness. The Metalmast part is MM #1 Wire Slide.
-DHP