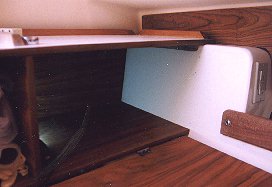
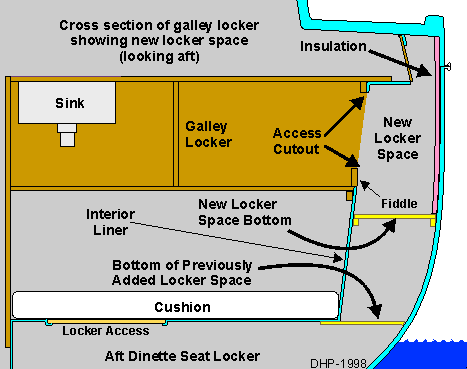
 The galley locker is basically a box shaped cabinet at the aft end of the dinette (see layout drawing). It has two compartments the inboard of which is largely taken up by the sink. The outboard compartment is the only good place on board to store food and galley items. The outboard end of this compartment is the interior liner. Between this liner and the hull is a 1.3 cuft volume of dead space. The space is basically in-accessible in the OEM configuration.
The galley locker can be seen (or partly seen) in these photos of the interior:
||Interior Looking Forward | Interior Looking Aft | Companionway Step ||
 I drew lines on the liner inside the galley cabinet and removed the cabinet. It is held in place by screws under the top and bottom shelf that go horizontally into the liner, and by screws connecting the vertical inboard panel to the side of the aft dinette seat. You have to disconnect the hoses to the water pump and sink to remove the cabinet. With the cabinet out of the way I cut out a rectangular opening along the lines I drew on the liner. I used a Dremel tool with a rotary bit and cut freehand. A jig or saber saw would also work but the fiberglass is very hard on the blades and a bit messy with the dust. With the Dremel I hold a vacuum next to the bit and suck up almost all of the dust as I cut.
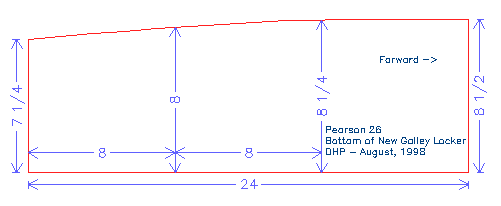
 I carefully measured the space for the bottom and forward panels I needed to build. I built the panels from 1/2" birch faced plywood "handi-panels". These are nice pieces of plywood and are very stable - they don't easily warp. I cut the panels and trimmed them to fit the space leaving a small gap (3/16") outboard to allow for some hull flexing. On the bottom of the shelf I routed out sections about 2/3 the thickness of the panel to lighten it. The bottom sort of looked like a TV dinner tray.
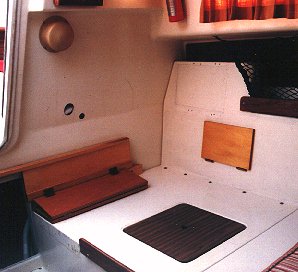
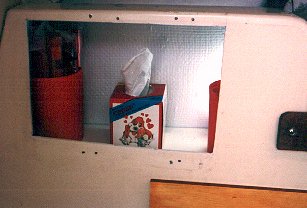 I painted the inside of the space with an good durable acrylic paint. I painted it white to help make it brighter. I also sanded the edges of the new cutout and painted them. I coated both panels and the wood support strip for the aft end with West System Epoxy with a white pigment added. I did 2 coats sanding between. I sanded the top to 400 grit. The finish came out very nice. It took several evenings to complete the epoxy. I got the best finishes by laying the surface flat and putting on a lot of epoxy and letting it level itself out as it set. There were no brush strokes left behind. There were some bubbles but they sanded out pretty well. The photo here shows the space with a few objects in it to give an idea of the size of the space. The object to the right of the opening is the top of the Olin flare container. It could be pushed another 2 or 3 inches to the right.
The new locker space extends to the inside of the hull right at the hull deck joint. We have a dark green cove stripe and when the Sun hits it the inside surface of the hull gets quite warm heating the space by several degrees. Also, on cool evenings after warm days, condensation can form on the inside of the hull. I insulated the space by gluing a sheet of foam core to the inside of the hull. I got it at an art supply store. A sheet of 1/2" styrofoam would also work with something to cover it (like formica).
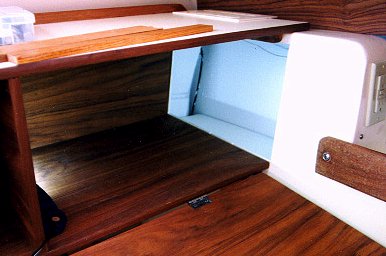 The new locker space expands the galley locker space by about 1.3 cuft or about 65%. This photo shows the locker before I mounted a fiddle to keep objects from sliding from the OEM space into the new space. The project took about a week working about 1 hr for 4 evenings. A lot of time is taken waiting for epoxy to cure. The total actual work time was about 5 hours.
I mounted a fiddle at the outboard edge of the original shelf to keep items from sliding off into the new space. This works fine but if I had left 1-1/2 inches at the bottom of the cutout I made in the interior liner I would not need the fiddle.